先来看作者给出的效果图:

系统环境

  • 系统环境:23.10 (Mantic Minotaur)
  • 内核版本:6.5.0-9-generic #9-Ubuntu SMP PREEMPT_DYNAMIC Sat Oct 7 01:35:40 UTC 2023 x86_64 x86_64 x86_64 GNU/Linux

项目部署

eDEX-UI 项目地址:https://github.com/GitSquared/edex-ui

部署方式:

方式一:直接使用 Release 封装好的包进行启动

1.安装依赖包,否则运行 eDEX-UI 会报:dlopen(): error loading libfuse.so.2 的错误:

sudo apt install libfuse2

2.从 eDEX-UI Release 页面下载 对应平台的包到本地(我这里是 x86_64 平台,所以直接下载 eDEX-UI-Linux-x86_64.AppImage 到本地的 ~/Downloads 目录):

3.下载完成后,赋予 eDEX-UI-Linux-x86_64.AppImage 可执行权限:

sudo chmod +x ~/Downloads/eDEX-UI-Linux-x86_64.AppImage

4.接下来,进入 ~/Downloads 目录,执行命令 ./eDEX-UI-Linux-x86_64.AppImage 启动 eDEX-UI:

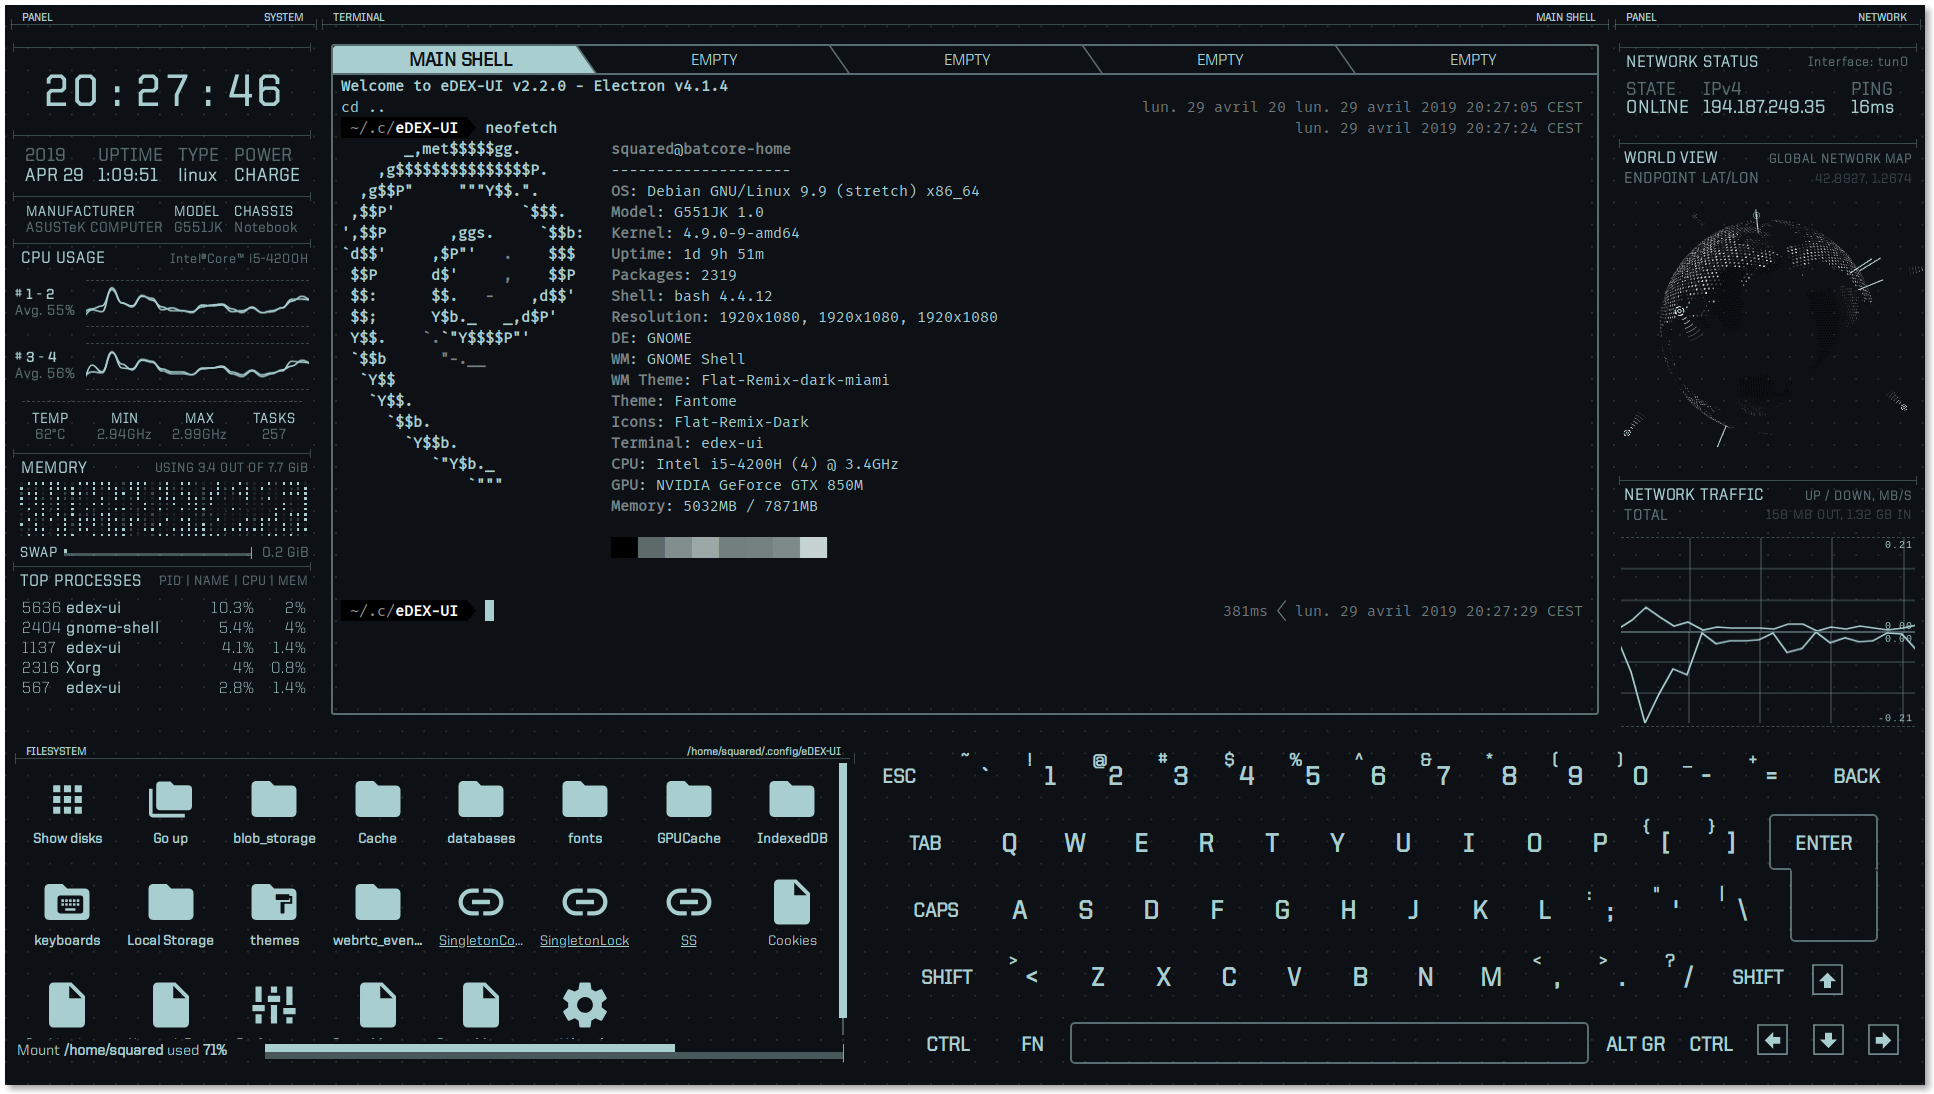
leazhi@ubuntu2210:/data/gitlab$ cd ~/Downloads/
leazhi@ubuntu2210:~/Downloads$ ./eDEX-UI-Linux-x86_64.AppImage
▶ start Starting eDEX-UI v2.2.8
ℹ info With Node 14.16.0 and Electron 12.2.2
ℹ info Renderer is Chrome 89.0.4389.128
▶ Startup Initialized timer...
ℹ info Base config dir is /home/leazhi/.config/eDEX-UI
☐ pending Mirroring internal assets...
☐ pending Loading settings file...
☐ pending Resolving shell path...
ℹ info Shell found at /usr/bin/bash
✔ success Settings loaded!
☐ pending Creating new terminal process on port 3000
✔ success Terminal back-end initialized!
☐ pending Starting multithreaded calls controller...
✔ success Multithreaded controller ready
ℹ info Creating window...
libva error: /usr/lib/x86_64-linux-gnu/dri/i965_drv_video.so init failed
ℹ info Multithread worker started at 1307173
ℹ info Multithread worker started at 1307170
ℹ info Multithread worker started at 1307171
ℹ info Multithread worker started at 1307172
☒ complete Frontend window created!
… watching Waiting for frontend connection...
ℹ info Multithread worker started at 1307174
ℹ info Multithread worker started at 1307176
ℹ info Multithread worker started at 1307175
✔ success Connected to frontend!
◼ Startup Timer run for: 12.03s
ℹ info Resized TTY to 184 040
ℹ info UpdateChecker: Running latest version.

方式二:使用源码编译安装

1.安装配置好 nodejs 环境,详细安装配置请参考:nodejs 之 http-server 模块的安装 中的 nodejs 安装部分

2.将 edex-ui 项目克隆到本地的:

git clone https://github.com/GitSquared/edex-ui.git

3.进入克隆目录:

cd edex-ui

4.执行:

npm install 
npm run build-linux

创建快捷启动方式

1.创建目录:

sudo mkdir -p /usr/local/edex-ui

2.将下载好的 eDEX-UI-Linux-x86_64.AppImage 移动到上面创建的目录中:

sudo mv ~/Downloads/eDEX-UI-Linux-x86_64.AppImage /usr/local/edex-ui/

3.从网上下载一个自己喜欢的图片放到 /usr/local/edex-ui 目录中;

4.将目录 /usr/local/edex-ui 下的所有文件都赋予 x 权限;

sudo chmod +x /usr/local/edex-ui/*

5.在 /usr/share/applications/ 目录下创建 edex-ui.desktop 文件,内容为:

[Desktop Entry]
Encoding=UTF-8
Type=Application
Name=edex-ui
Exec=/usr/local/edex-ui/eDEX-UI-Linux-x86_64.AppImage
Icon=/usr/local/edex-ui/hacker.jpeg
Terminal=false
Categories=navicat;

6.按键盘上的 田字键 ,搜索 edex 关键字,就可以使用快捷方式打开 edex-ui 了!

主题配置

主题配置主要修改 ~/.config/eDEX-UI 目录下的 settings.json 文件,默认主题为 tron,将关键字 “theme” 的配置修改为 ~/.config/eDEX-UI/themes 下的文件名,比如为这里修改成了:

{
"shell": "bash",
"shellArgs": "",
"cwd": "/home/leazhi/.config/eDEX-UI",
"keyboard": "en-US",
"theme": "tron-disrupted",
"termFontSize": 15,
"audio": true,
"audioVolume": 1,
"disableFeedbackAudio": false,
"clockHours": 24,
"pingAddr": "1.1.1.1",
"port": 3000,
"nointro": false,
"nocursor": false,
"forceFullscreen": true,
"allowWindowed": false,
"excludeThreadsFromToplist": true,
"hideDotfiles": false,
"fsListView": false,
"experimentalGlobeFeatures": false,
"experimentalFeatures": false
}

如果想要再炫一点,可以安装下骇客雨包 cmatrix ,然后在打开 edex-ui 界面后,在 MAIN-bash 里面执行 cmatrix 命令即可!